Tuesday, January 25, 2011

Sanding, filleting, and saturating the inside of the hull

After finishing the inside of the deck we sanded and scraped the inside of the hull till it was smooth enough to not snag the fiberglass cloth when we spread it out. Then we filled all of the wire holes and parts of the seams that were still not filled with a small bit of epoxy and sanded those too. Then we put a small bead of regular epoxy down the stem seam.
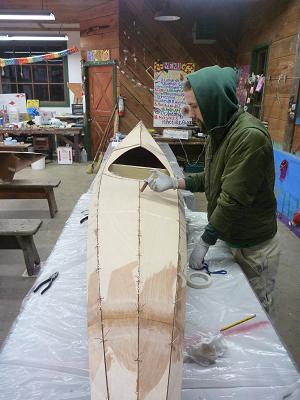
We then mixed up a bunch of really thick epoxy and made a thick fillet down the inside of the stem seams.


At the stern stem a tongue depressor was squished up against the thick epoxy to hold it in so that later there will be a thick fill of epoxy that we can drill through to make hand toggles and a rudder.

I wanted to make sure that the fillets were nice and smooth before they dried because sanding down into the stems would be very difficult and the fiberglass is going to need to not get caught on any little protrusions.

Next we put three layers of fiberglass over the bow butt seams. One strip of 2" wide cloth, one 3" and one 4". The manual says to only do two layers (I think, it was a bit confusing) but when I watched the video that Pygmy has on youtube of the building of the Arctic Tern 14 (which has been very helpful) I noticed that they did three layers, so I did too.

Then we rolled on a layer of epoxy to saturate the inside of the hull to get it ready to fiberglass.

Saturday, January 15, 2011

Deck Fillets and Fiberglass

Well, Mike is still a couple steps ahead of me, but we've both at least come this far:

Once the outside of the deck was glued together, it was time to work on the inside of the deck. First, thickened epoxy fillets were added to the deck reinforcement plates, and two layers of fiberglass tape were added to the seams. We also made fillet "ramps" in front of and behind the reinforcement panels to make things nice and smooth.

Bold
The same thing was done to the deck recess and reinforcement plate, in order to make sure the fiberglass would smooth out over it.


Bumps and drips were sanded/scraped to smooth out the deck, then all of the seams were laminated with fiberglass tape.


The tape was left to get tacky, then the deck was set back on the hull in order to ensure the deck drying in the proper shape. We put plastic over the temporary frames and at the bow and stern ends to make sure the deck didn't get glued on (yet). After curing overnight, the deck was removed, the sharp edges of fiberglass tape sanded, and the deck recess and rear cockpit were fiberglassed (with two layers!). Besides the tape on the seams, this is the only fiberglass that goes on the underside of the deck.


Once the fiberglass on the recess was looking good, the rest of the deck received two coats of epoxy.

Even thought the the decks (well, the undersides, anyway) are officially "done," I think it might still take a little work to get everything nice and smooth. I definitely don't want any little sharp points snagging things inside the boat, so some more sanding might be in order. And thanks to the generosity of the maintenance department, we now have access to a fabulous palm sander! This makes life so much easier...Things are really starting to shape up and come together, but there's still a lot of work to be done.

Stay tuned for inner hull fiberglassing!

Tuesday, January 4, 2011

Wiring and epoxying the deck

My next step was to lay the deck panels on the hull and wire the bow center pieces then add, drill holes on the shear deck panel opposing the already drilled holes on the center panel and wire them. Then I add the back center panels, drill and wire.

The deck recess plate (below) was a little tricky to get into place correctly, but with a little fiddling it seemed to fit pretty well. Unfortunately the smaller end of the half moon piece (near the shear) broke off. I ended up wiring it in and just putting a lot of epoxy in it and I think it will be fine. There was also a little gap in a similar place on the other side. I put plastic on the inside of it and filled the little gap with epoxy, the plastic made sure that all the epoxy didn't just run through.

It looks like a kayak!

After making sure it was aligned evenly I put two wires on each side near the center butt seam through the hull and deck to hold it in place. Then used a bunch of strips of strapping tape to hold the deck all around. I put some plastic at the bow and the stern in between the deck and the hull (to prevent sticking the two together).


Then I used the syringe and just like on the hull put a bead of epoxy in each seam, waited about 45 minutes then put another bead of epoxy this time thickened with wood flour wherever it was needed.

Then I had to work a bunch over the weekend and didn't have time till much later to get the wires out. When I tried to get the deck off the hull it wouldn't come off. Shit. The epoxy had run down the inside from some small gaps in the seams and stuck the deck to the hull. Luckily I just pulled up hard and it popped off with only a little loss of wood on the edge of the panels (and it was only in a few places). The epoxy wasn't still "green" and so I thought it would be a lot harder to get the wires out...and it was until I used the tip of a heated up glue gun to heat up the metal and melt the epoxy around the wire. Then they came out quite easily.

I don't have any pictures of it but after I got the wires out I used a combination of the glue gun (which does a really good job of breaking down big drips of epoxy quickly), the cabinet scraper and the file/rasp to get all of the excess epoxy that dripped through to the underside of the deck. Then I put it back on the hull and added another round of wood flour-thickened epoxy to any seam that needed it.

Monday, January 3, 2011

Keel Surgery

So while Mike was valiantly forging ahead and making progress, I was having a bit of a setback. My keel was twisted. There was an S curve to the stern stem that started from in front of the stern butt seam. It looked like this:


It's a little hard to see in the picture, but it was not good. Previously, in a moment of frustration combined with really wanting to move on to the next phase, I had deemed the slight twist to be "probably not that big of a deal." At the time (after finishing wiring), the thought of rewiring seemed like a daunting task. So I went ahead with the epoxying of the seams, thinking that I could somehow "fix" the twist with the thick wood flour bead used to round the stems. Of course, that didn't work at all.


As I continued on, I kept thinking about the twisted keel and how annoying it would be if it made the boat track improperly, and WHY didn't I just fix it when I had the chance? Once the hull was ready for fiberglassing (after which there'd be no turning back), I took another look at it. It looked bad. It bothered me. Fixing it would be annoying. Paddling for months in a boat that didn't move properly would be REALLY annoying. It had to be fixed. I stewed about the whole thing for a couple days, then sucked it up and got ready for kayak surgery.


Step one involved filing/scraping off the thick wood flour/epoxy bead that covered the stem. Not so bad. Then the triangular stern brace had to be removed, so that I could cut open the keel and move the panels around. Here, the tip of the hot glue gun is being used to soften up the glue holding the brace in:


Once the brace was out, it was time to open up the keel. SCARY!! Some folks online recommended using a saw to cut the panels apart, but the thinnest saw I had was still too thick, so I used a razor knife to separate them. I kept having visions of the boat suddenly splitting apart and exploding into tiny pieces, but this did not happen. There was a moment when I got to the curve in the stem when a good chunk of the keel cracked open that made my heart stop, but the boat had split where I wanted it too, so all was well. Once I got past the curve, I turned the boat over onto level benches and strapped it down with strapping tape (which I had also wrapped around the hull in several places, just to feel good about keeping everything together).

The tip of the hot melt gun worked wonderfully to heat up the epoxy so that the knife could slice through it like butter. It also worked really well to "dig out" the epoxy from the groove in the keel. I worked my way along the keel inch by inch, till I got to about 6 inches in front of the stern seam.


Once the keel was split open, it became clear that I needed to separate the first panels, too, so I repeated pretty much the same process to release both the #1 panels. The whole process took somewhere around 6 hours. Once the panels were sanded smooth, it was time to rewire them:


Hooray! The loosely wired panels were clamped back together, then the clamps were wiggled around all over the place until everything looked straightened up (which was hard to see with all the wires in the way...), then the stern brace was put back in, the wires tightened up, and the seams re-epoxied.
Three days after surgery began, I had a straight keel. At least it's 99% straight. It's a hell of a lot straighter than it was, anyway, and here it is all shiny with a saturation coat!

I feel like a proud mother of the Little Keel that Could. It looks much, much better and I'm quite happy with how it turned out. The wood on the stern is a little marred in some places, but otherwise you can't really tell it had been fixed. I had been really dreading (and whining about) this whole process, especially after all that scraping and sanding, all I wanted to do was get the hull glassed. But I'm SO glad I took the time to fix this, and it turned into a great learning experience and confidence boost.