Wednesday, February 23, 2011

Bulkheads!

Putting in the bulkheads was one of the most frustrating things either Kelly or I had to do.

They came pre-cut. First we had to fiberglass both sides of the panels. Then squeeze them in by measuring where they should go and filing and sanding them so they will fit. Once they are in correctly then you fillet the edges all the way around on both sides with thickened epoxy and wet out fiberglass tape over them. The tape is tricky to get all the way around the edge of the panel without it bunching up, so you have to cut it at the corners.

Fitting the panels in correctly and taping them were both super annoying.

Stern bulkhead.

Bow bulkhead.

This is Kelly being pissed off at the stern bulkhead.

Tuesday, February 22, 2011

Filleting and taping the inside shear seam

So this step is much easier if you already have the hatches cut out. We didn't get any pictures of it but we fashioned a three foot long extendo-syringe filleter. I took a three foot long, one inch diameter round dowel and put two eye screws in it. Then duct taped the syringe to the end and pushed a small diameter dowel through the eye holes to depress the plunger and squeeze out thickened epoxy to make a fillet along the shear seam. Obviously having the hatches cut out allows you to reach further, and therefore be more accurate with the filleting.

After filleting the seam you lay tape along it as far as you can reach. With the hatches cut you can put tape much further towards the bow and stern.

Then you take non-thickened epoxy and wet out the tape.

We let that cure, sanded it smooth and then tilted it the other way and did the other side.

Saturday, February 19, 2011

Cutting hatches

Cutting hatches...definitely one of the scariest steps in the process. We are going to take our beautifully put together and fiberglassed boats and just cut holes in them??? Talk about nerve-racking (I looked it up, wracking and racking are interchangeable). Just an fyi, we are doing this step a bit out of order so that we can use the hatch openings to extend the fiberglass tape that goes on the inside of the shear seam, as well as just make the step after easier (you'll see).

To start with you take the wood spacers provided with the hatch kit and measure and draw out the outline of where you will cut. Be sure to measure according to the instructions and measure from the inside of the spacer. I messed this up originally and ended up cutting my spacer way too much at first (I just joined the cut off pieces back on with fiberglass tape, just like connecting the butt ends of the panels). After that experience I opted to wait until after I cut the hatches out to cut the spacers, I think that worked better.


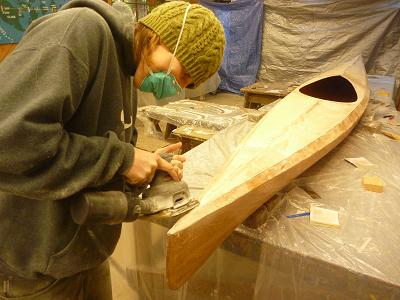
Once everything is finally measured correctly you take a drill and drill five holes right next to each other along the hatch line (Kelly didn't do this step and it seemed to work out just fine). Then you take a thin fine tooth (the finer the better I think) jigsaw blade, clamp it in a vise grip, and saw away! It wasn't perfect, the lines were a bit wiggly but since what you cut out will be the hatch cover it doesn't matter too much, the wigglies will match up.

Saw, saw, saw. It took awhile, we wanted to be careful.


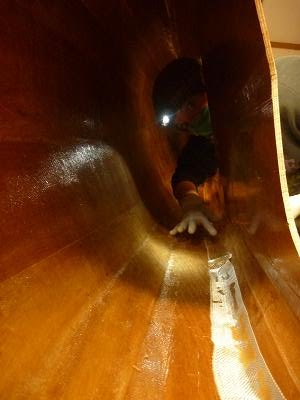
Then when it is just about cut all the way I punched it out from inside! Blam!


Just kidding. That would be reckless (reckless, not wreckless although it would potentially also be without any wrecks).

Now there are hatches!

Wednesday, February 9, 2011

Fiberglassing the deck

After sanding the whole deck and rounding the seams, you roll on a layer of epoxy as a saturation coat and let it harden.

Then you put a strip of masking tape an inch below the shear seam all the way around the outside. Then you lay out the final section of the fiberglass cloth and fit it just like the cloth in the inside of the hull. I trimmed mine a little too much on one section of the stern and had to put a separate section of cloth over it to fill it out.

Once the fiberglass is trimmed and covering the whole deck and the edges are even with the tape, you wet out and laminate the glass to the deck.


After it hardens, trim the fiberglass at the edges and pull off the tape in the same manner as the inside of the hull.

Two more layers of epoxy later and it looks like a boat!

Sunday, February 6, 2011

Attaching the deck to the hull

For some reason we didn't get many pictures from this section.

The first step is to get the deck situated on the hull correctly and apply a crap ton of strapping tape to make sure stays put and that the shear seams have as little of a gap as possible. The manual says that you can drill more holes and add more wires where necessary, but we just used a bunch of strapping tape and it worked fine. Then you tilt it up on it's shear seam and using a syringe just like the other seams squeeze out a bead of epoxy across the entire seam. Let that harden. Then flip it over and do the other side. The way it is described in the manual it sounds like they say to just put epoxy in the shear seam all in one step and that it isn't necessary to tilt the boat and do it in two steps. I just felt better doing it this way, it seemed more sure that the epoxy would get in all of the seam.

Once both sides are hardened and the tape is removed it is time to add the wood flour thickened epoxy where there are gaps in the seam.

Once all the gaps are filled and the seam looks nice and stuck together then I sanded the whole deck and rounded all the seams (especially the shear seam) in preparation for glassing.

Fiberglassing the inside of the hull

In preparation for glassing the hull you put a strip of masking tape on the panel just above the highest seam. Then you lay out one edge of a 9 foot long section of fiberglass cloth along the masking tape, starting at the center of the boat and covering the bow. Masking tape is put on that edge connecting it to the boat to hold it in place while you cut the other side with a razor knife so that it is even with the tape on the other side.

The large triangle that you have left over from the 9 foot section should fit on the stern half of the boat with a 2 inch overlap. Apparently neither Kelly nor I have been accurate enough, so there is a gap between the two sections of cloth. This is okay, you just need to get some scrap cloth and fill the gap making sure that it overlaps the other cloth by two inches on either side.

Then tape and cut it just the same as the bow.

I then removed all the tape that was holding the fiberglass to the wood and then epoxied everything. Kelly removed the tape as she epoxied, which I think worked much better.

It was hard to make sure that the cloth was adhering in the seams. Lots of squeegeeing (is that a word??) and smoothing out with our hands did the job pretty well. I definitely have a few little bubbles here and there.
Then while the epoxy is still pretty fresh (a few hours depending on temperature) you go back and with a razor knife cut along the fiberglass at the bottom edge of the tape. Then just pull the tape off. It will definitely be harder if you wait too long.

Then I added a little fill coat where it seemed a bit rough, at the edge of the glass and where my feet would be. Then sanded out any roughness that was left in the hull and at the edge of the tape.