Saturday, March 26, 2011

First test paddle

Pretty much the last thing to do before we could take them out on the water was to put on all the padeyes, hatch straps, and deck lines. Kelly finished up doing that on her boat on Friday evening and we took them out for a test paddle!


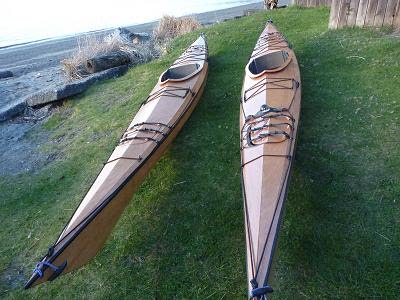
The misgivings I had about the keel being straight disappeared and Kelly's hard work on realigning hers paid off. They look great outside despite all of the small (and not so small) imperfections in the end result. I could tell the fatty harbor seals who followed us around huffing out their noses appreciated the natural wood finish on the boats. The Grebes who made strange video-game-esque calls and dodged out of the way of our bows were probably thinking: damn, that's a good looking boat. I rolled mine with relative ease, I am still deciding whether or not to install the keyhole knee braces. Either way I definitely need to put some foam where my knees contact the boat. We also still need to install rudders sometime before June.


Probably the largest step in our journey to paddle the inside passage is now complete. We have also planned our route, ordered charts, accumulated pretty much all the gear we need and even bought our tickets to Glacier Bay (we leave from Bellingham on June 17th). All that is left really is planning and buying our food and resupplies.

Friday, March 18, 2011

Varnish!

We used Pettit Z-spar Flagship Varnish to finish our boats. We rolled the varnish on with the same type of rollers we used to roll on the epoxy and went over that with a foam tipped brush.


Three coats on the hull and then 3 coats on the deck.


It didn't get perfectly even, I did two coats back to back without sanding in between. Then I lightly sanded with the green side of a sponge before adding the last coat.


It didn't get as even as I would have liked, I could have probably sanded and done some more coats of varnish, but I am pretty happy with the way it is.

Taping the shear

We decided to run a strip of black electrical tape along the shear on the outside of the boats before varnishing. I think it looks pretty cool.

Monday, March 7, 2011

Final sanding

Before we put in all the deck rigging, the hatch straps, knee braces, foot pedals, rudders, etc... we decided that we would just varnish the boats first. You don't have to varnish your boat right away, you can paddle it for months before the weather really starts to take a toll. But we figured since we will be going on a three month trip and we have the shop space and time for just a little bit longer that we should do it now. And to varnish the boat means that we need to sand the shit out of it. So that's what we did. We started with 120 grit and finished with 220. It isn't going to be a perfect finish but like we've been saying all along, for us these boats are for paddling, not for a showroom. They're gonna get all beat up right away anyways.

You want to sand it enough so that it is kind of a matte finish. You don't want any gloss left over. The varnish will make the dotty texture disappear, you just don't want to sand through the fiber glass! (which is fairly hard to do with 220 grit sandpaper).


Still glossy on left. Mostly matte on right.


We used a palm sander with some hand sanding as well.

Saturday, March 5, 2011

Hatch covers

After drilling all the holes and epoxying them we loosely put the hatch straps in. The next step is to glue some half dowels on the hatch cover. It is easiest to use the straps to measure where to put the dowels.

When the straps are tightened on the dowels it creates more downward force on the hatch covers and makes a more watertight seal.

I didn't glue the foam on the hatch lip yet cause I don't want to ruin it during the final sanding and varnishing process. But to get a proper measurement and proper force on the dowels while they are being glued on I taped the foam on the hatch lip temporarily.

After marking where the dowels will go I mixed up some wood flour thickened epoxy and glued the dowels to the hatch covers.


To make sure the dowels are glued onto the cover well I tightened the straps over them. Also I put some plastic wrap under the straps so that any epoxy that squeezed out wouldn't get glued to the fabric.


Done!

The next step is to saturate the dowels with epoxy and attach a pad eye with really thick epoxy to the underside to make a leash.

Friday, March 4, 2011

Drilling holes in the boat

Before we varnish the boat we want to drill all the holes in the deck, hull and hip braces required to attach the deck bungies, hatch straps, perimeter lines, seat, and foot braces. Then saturate them with epoxy.


Kelly measuring where to drill.

Drilling.


Hatch combings

The next step is to attach combings to the hatches for the hatch covers to make a seal on. It is very similar to making the cockpit combing but the spacer and lip extend to the inside of the boat and are much thinner.

The very first thing is to cut the spacers to the right length and epoxy saturate them. Also you need to fiberglass the lips then cut them to the right length as well. I messed a couple of these steps up. First I cut my stern spacers hastily and they ended up too short. I ended up getting the little pieces that I cut off and fiberglass taping them back together and then recutting them. That worked fine. Then I also overcut/cut at the wrong angle my stern lips. Those I couldn't just reattach because I had done so much filing, so Pygmy sent me some new ones, and it just took a little longer to finish the hatches than I thought.

Once everything is the right length, just like the cockpit combing, you use clamps to glue the spacers to the boat (with wood flour thickened epoxy).


Once the spacer dries you attach the lips.

And ta-da! Finish off with two layers of fiberglass tape on the underside of the seams, a bit of sanding and filling in gaps with epoxy and they're done. We will bed some foam around the lip so that the hatch cover can make a nice watertight seal.

Tuesday, March 1, 2011

Cockpit combing

First step for putting on the cockpit combing is to saw the spacers into the right lengths and then saturate them twice with epoxy, letting them cure in between coats.

Then using 10 clamps per side you glue the spacers to the cockpit with epoxy that has been slightly thickened with wood flour.

The combing lips have to be fiberglassed on both sides first and then cut to the right length as well. I used the same set up to cut these as I did to cut out the hatches (vise-grip with fine tooth jigsaw blade).
I cut them a tad on the long side then made up the difference by filing a little at a time to make sure the length and angle were correct.

Once everything fits correctly you attach them to the spacers with a bit of wood flour thickened epoxy and clamp them down again. I put a small piece of plywood between the clamp and the lip so that it didn't leave an imprint. I also put a small piece of plastic between the extra plywood and the lip so that the wood didn't get epoxied to it.

Then once that is attached you put a piece of fiberglass tape over the seam where the two lips meet in the back and front of the cockpit.