Saturday, December 25, 2010

Glassing the hull

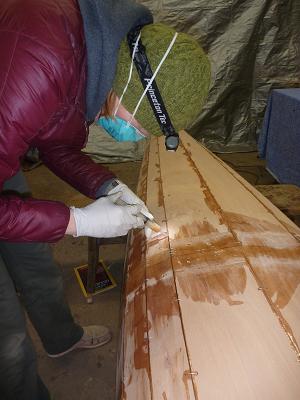
Once the hull was free of sawdust I mixed up some epoxy, poured it into a paint tray and used the thin rollers that we bought at Pygmy to roll a thin saturation coat over the entire boat.
Then I went over all of it with a foam brush to smooth out any drips or bubbles. And let that dry overnight.
Then I lay the fiberglass cloth over the entire boat cutting it about 1-2 inches from the sheer seam and doing the little cut on the stern that is described in the manual. I was a bit worried about the cloth sliding as I rolled epoxy on it so I placed some weights on the top and used some scotch tape to attach the inside of the cloth to the inside of the boat. I probably didn't need to do this but it worked this way anyways.
Then I rolled epoxy over the cloth doing 4.5 oz. batches at a time. I used a squeegee to get all the excess epoxy off after the cloth was wetted. I have been very careful to not use too much epoxy in any step because I don't want to have to go through the scraping madness I had to previously.
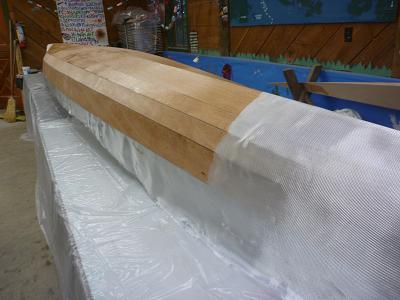
You can see the difference between cloth with epoxy and without. It is completely see through. Once done with that I let it cure overnight.
Then I rolled a fill coat of epoxy (again making sure it is thin and smooth) over the entire boat. I placed a strip of fiberglass tape over the keel seam and used a bristle brush to wet the tape entirely with more epoxy. You can see the tape on the keel.
Then one more fill coat. After doing all this it really made the color of the wood pop out and I can definitely see a few scratches and discolorations under the fiberglass but it looks sweet overall.

Monday, December 20, 2010

Scraping, scraping and more scraping

And then it was time to scrape off all the excess epoxy from doing the seams. Oh man I wish we had been less messy. And thank you whoever invented the cabinet scraper. Shown below is how we scraped the epoxy off. It took me about a week (mostly because I had to work, too, and because I don't have robot arms). Kelly had to work more so had less time to scrape and she should be done soon.

We turned this...


into this...


...and finally to this. The cabinet scraper gets dull pretty easily and to sharpen it we used Todd Clippinger's method. This doesn't get "the finest" finish. But I have come to terms with the fact that my boat won't be the prettiest out there. I just want it to get me from Alaska to Orcas. And for that it doesn't need to look awesome.

After all the scraping, I did a little sanding, and used a moist sponge, a pin, and my lungs to get as much sawdust off as possible.

Epoxying and rounding the stems

The stems (the part of the keel seam that goes from the bow and stern towards the center of the keel until the edges of the panels meet) need to get a large bead of epoxy that is crazy thick with wood flour. Make sure it isn't too thick though, I made my first batch with too much wood flour and it caused only the more liquid elements of the mix to come out making it too thin and leaving a bunch of really thick epoxy stuck in the syringe. It should be thick enough though so that when you put it on the vertical stern seam it won't drip.
We let those large beads thicken and then wrapped some duct tape around the end of our file (so it reduced the scratching on the panel) and filed the bead flush with the panel on either side so it pretty much made a point. We then filed and sanded that bead round.

You can see the difference!

Thursday, December 9, 2010

Epoxying seams and clipping wires

Once all the seams were wired we put the boats on three benches (essentially sawhorses) and used a level, a long 2x4, and old national geographic magazines as shims to get everything level. Our boats didn't seem to twist too much, so we ran our hands along the inside and outside of the seams to make sure that the seams were making a smooth, even transition. We eyed the keel and made adjustments to make sure that there weren't any flat spots (that we could tell) and that it was straight. Then we epoxied the seams.
Epoxying the seams made me the most nervous of all. I mean drilling holes in the wood seemed scary and permanent, but this was worse. Once all the seams are epoxied that's pretty much it unless you really mess up and you have to go back and remove all the epoxy...that would be horrible.

So we mixed up some epoxy and put it in the supplied dental syringe and squirted a bead along all the seams except the very ends of the boat where it is too vertical. It was fairly messy...but we can scrape, file and sand all the excess epoxy drips later. Oh and the power went out hence the headlamps, we were a little worried about the epoxy getting too cold in the jugs and it did start to flow a bit slower but it seems to have turned out fine.


We waited 40 minutes then went back over each seam with a bead of wood flour-thickened epoxy. The seams were left to cure over night. We didn't realize this at the time, but any excess wood flour epoxy has to be taken all the way off (as opposed to clear) because it will show up after we glass the hull. Needless to say we could have probably been less messy and saved work down the line.

The next morning we tipped the hulls up on their sides to do the same process as above with the previously vertical end seams. We found that it was hard in the previous step to fully get the seam nearest the sheer line of the hull epoxied so we added more to that seam too. The epoxy was left to dry for 8 hours, and that evening we did the other side.

Here was another very nerve-wracking step:taking out the wires. In our heads we were imagining that we some how messed up the epoxy and as soon as we clipped the wires all of the panels would spring open again and we would have to start all over...this didn't happen. This was actually much easier than I thought it would be. I thought since the wires had a lot of epoxy on them seemingly attaching them to the wood that it would be very difficult. Since we clipped the wires while the epoxy was still a little "green" they came out relatively easily. I found the easiest way was to clip the center of the all the wires on the outside of the hull and peel the ends of the wires up on both sides then clip them flush with the boat. Then turn the hull over and pull the twisted end out with pliers. It was difficult to not mar the wood a little bit...we did the best we could.

And now we have all the wires out and are refilling the seams that didn't get enough epoxy in the first few steps with more wood flour-thickened epoxy.

Tuesday, December 7, 2010

Wiring the Hull

Now that the panels were drilled, it was time to wire them together! This step was both hugely satisfying and incredibly tedious, as we spent a good 9 hours twisting together tiny wires.

First we propped the boats up on boxes/crates/buckets while we wired the keel together. Pygmy recommended bending the wires over a scrap of wood to make a "staple," but we found that this made it harder to fit the wires through the holes. It seemed easier to just leave a curve in the wire, then pull it tight with pliers. After the keel was wired together we attached the bow, center, and stern frames to the keel seam. The frames generally flopped around and got in the way for the rest of the wiring process.


Once the keel was wired, it was time to attach the next panels. Before they could be wired, holes had to be drilled to the bottom of next panel, directly across from the holes that were pre-drilled (the day before) in the outside of the keel panel. We had initially thought that this would be tricky and involve lots of clamping and measuring, but quickly realized that we could just eyeball where the hole should go and (carefully) hold the panel while drilling. Drilling soon became a much less scary process.


After the corresponding holes were drilled, the chines were wired together, (twisted by hand first, then tightened with pliers once all the wires were in). This process was repeated for the rest of the hull panels. The keel and bow stems got extra wires added to help keep everything in place.

Once all panels were added and the chines wired together, it was time to (finally) wire the frames to the panels. This shaped-up the hull and made everything feel really solid. Our boats now looked like boats!! We also wired in the stern and bow wedges. Interestingly, the bow of Mike's boat was really narrow, and the wedge had to really be *wedged* in. My bow was much wider and I had to do a lot of wire tightening to get the panels up to where they needed to be.

We then hot-glued the frames into place, and got ready to flip the boats over and epoxy the seams.

Thursday, December 2, 2010

Drilling!

We had to drill holes the whole way down the edges of some of the panels every 6 inches. This made me kind of nervous...drilling holes in our new kayak panels? But I think it worked out. I ended up not using a jig as it mentions in the manual. I just measured every six inches and drew a dot 1/4 " away from the edge of the panel, then clamped them to the table and drilled away, we'll see if I was precise enough when we wire the hull together today. Since Kelly and I are building boats at the same time I just stacked all four like panels together and made sure they lined up well and then drilled all four at once. Saved a little bit of time.

Wednesday, December 1, 2010

Bevelling the shear seam


The cockpit reinforcement panels glued on nicely. They weren't cut exactly right so some of the reinforcement hung over the deck panel on a couple of them. But that was no big deal because we had to bevel the reinforcement panels on the edges anyway, which we did with our handy 4 in 1 rasp/file. We got the sides to as much of a 45 degree angle as we could.

Then we brought our project off the floor and onto tables! A very exciting moment. We clamped panels 4 and 5 (the outside deck panel and the top hull panel) to the table and used a plane, wood rasp and sand paper to bevel the entire edge of the panels where they would meet and create the shear seam (the seam where the deck meets the hull). We bevelled through the inside two plies of the plywood at a 45 degree angle (well as close as we could get to one).

Wednesday, November 24, 2010

Reinforcing the deck panels

Align the four deck panels so that the butt seams are even so you can place the supplied 3 1/2 " plywood panels right in front of the cockpit on the bottom side of the deck. We drew pencil lines to show where the panels should lie and then drew lines on the plywood section where they needed to be cut. We didn't make it completely flush with the deck panels, they overhang a little bit, but we will have to bevel them anyways, so they can just be filed and sanded down later.

Once everything was cut we mixed some epoxy with wood flour till it was about the consistency of honey and brushed it on the both panels. Then we pressed the reinforcement panels down on the deck panels and weighted them with bricks.

Finally we cleaned all the excess epoxy with the squeegee and let it cure.


Issues and troubleshooting: taping and epoxying the butt seams

So we ran into a few issues during the first section. Here's how we dealt with them (with the advice of the awesome Pygmy people):
  • The first I would say is just that my first seams were really messy. I had some bubbles/small sections that weren't covered with epoxy, the corners of the tape weren't completely clean and peeled up on a couple seams, and I also didn't clean the epoxy very well off of the face of the panel. The little bubbles and small uncovered sections were okay to leave and will get filled in when we epoxy and glass the whole boat. The little non-epoxied corners of tape I just cut off with a razor knife and the space left will get filled in later. The epoxy that wasn't cleaned well on the faces just had to be filed and sanded a lot to get it smooth.
  • The epoxy on Kelly's second set of seams didn't cure correctly (meaning it never hardened). We still don't really know why. I think that it was because she reused the mixing cup which we earlier tried to clean with acetone. I think there was still acetone residue in the cup that got mixed with the epoxy and caused it to never cure fully. She had to use lacquer thinner (you can use acetone on the plastic tools but not on wood, for wood you need lacquer thinner) to get as much of the epoxy off the panels as possible. Then she sanded the rest off until it was back to wood. This wasn't too hard and didn't take too long. We have been using new cups and stirring sticks every time and haven't had that problem again.
  • On one of my seams the 2x4 ended up partially on the panel and got glued to it. I had to rip it off and some of the first ply of the panel came with it. I filled it with a little bit of epoxy to try and even it back out with sand paper later.

Sanding and filing the cured seams

Above is a seam that has finished curing but hasn't been cleaned yet. First we used a razor knife to cut the excess fiberglass tape off the edges. A lot of the epoxy had splooged out on the side where I couldn't clean it up with a squeegee. On the first seams (which were super messy and uneven) I tried to use the razor knife to get all the epoxy off, not just the tape. I found it much easier to shave the cured epoxy with the knife just a little bit and then use a file/rasp to grind off the rest so that it is flush with the wood. We found a 4 in 1 file/rasp at the hardware store that has 2 different rasps and 2 different files all on one. It works really well. Kelly used a straight razor blade to scrape the epoxy off and then 60 grit sandpaper to finish it. Both worked pretty well.

We also sanded down the face of the panel to make the transition from normal wood to epoxied seam smooth. Since I did such a poor job of squeegeeing the first set of seams I had to use a rasp first to grind off all the epoxy then 60 grit sandpaper to finish it. Below is a pretty finished seam.

Also just to note that we let the epoxy cure overnight after each set of seams and there are 8 sets of seams so it took about 8 days to do this first section.

Epoxying the butt seams


We kept the epoxy and hardener in our house and when we brought it over to use it we kept it in front of a warm lamp to keep it from getting too cold. We mixed the epoxy in small plastic juice cups (we used a new one each epoxying session).

We mixed the epoxy under the warm light as advised in the manual if working in cold conditions. I did inside of the left side first and we each did just one seam at a time. We put plastic wrap under each seam and weighted down each panel with random objects. The first seams we did were really messy, so we learned that you should just coat the panels with epoxy, put the light fiberglass tape down, paint a little more epoxy until all the tape becomes clear. Then you don't need to go crazy with epoxy on top of that but put a nice dollop on and spread it out a bit.

Then place the plastic mylar down and push all the bubbles out and press the plastic down so that all of the epoxy is in contact with the mylar sheet.

Then we put the section of 2x4 on top of the plastic making sure that none of it is touching the panel.
Then place weights (we used two bricks wrapped in plastic per seam) on top of the 2x4. The plastic/2x4/bricks will float a little bit, I just pressed it down and waited till it stopped moving. Then go back and clean up all the epoxy that was squeezed out with the squeegee. It makes sanding and filing much easier if you do this part well. If your 2x4 doesn't cover all of the plastic, I found pressing the squeegee down on the edges of the plastic to squeeze out the rest so that when it cures it is all as even as possible.

Panels!

So, here we are ready to start building Pygmy Cohos in the arts and crafts room of camp. Hopefully the boats will end up looking better than the majority of the craft products that have been produced in this room over the years... Neither of us has any experience building boats, or really doing much of anything involving wood or epoxy or construction. And we aren't exactly using a state-of-the-art workshop facility, so we'll most likely do a fair amount of improvising. But we will be able to borrow a lot of tools (thanks Camp Orkila maintenance crew!) and there are plenty of resources to help us along the way. We're facing a pretty steep learning curve, but research shows that clumsy novices across the country have successfully built beautiful, functional boats, so hopefully we will, too.


We laid all the panels out for our two cohos in arts and crafts. The boats that we will use to paddle the inside passage this next summer! We put some tarps over the drafty doors to hopefully keep some of the heat in over the winter. We also put down old bed sheets to keep everything a little cleaner and hopefully not let errant glitter get epoxied to the boat.

Friday, November 19, 2010

Name change, big project start

So since I last posted we spent all summer in our geodesic dome, leading 3 hr. kayak tours (insert Gilligan's Island joke here), going on some of our own paddling trips, biking our 5 mi. "commute" each day, and spending lots of time in coffee shops. Pic: view from Eagle Cliff on Cypress:


Then the fall went off without a hitch, our second season as lead instructors passed by quickly and funly (yes I know that's not a word). Multiple fun trips to Seattle and Bellingham including seeing the National at Marymoore (which was super rad), Kaitlyn and Michael's wedding, a tiny bit of apple picking and of course "Men's Wellness Retreat feat. Jenna". Which was an attempted paddling trip to the northern islands which ended up being a 2 night party on Pt. Doughty. Pic: men getting well feat. Jenna


Now we have hunkered down in the Dispensary at camp. I am cooking at Doe Bay Cafe which is great, I am learning a lot and having fun. Kelly is waiting tables at Allium and is planning on substituting in the schools.

We have a huge project underway to keep us occupied...building kayaks! We are going to keep a detailed account of the process. We are currently epoxying seams, and will finish that this week and then will have our first kayak building update!

By the way we changed blog address to chipsncake because as most probably know...I love chips, and well Kelly loves cake. And we often have discussions on the merits of each and which are better.

Monday, June 28, 2010

Summer's here already?

This spring flew by. Weeks consumed by running around, computer typing, puke cleaning, class helping, staff supporting, injury dealing, and so on. I could go on as to the many jobs/roles/niches we filled as lead instructors for camp. The weekends were generally filled with decompressing and hanging out with people that we love. A few weekends I got out and did stuff.

James and I early in the season got down to the mainland and paddled the Sauk river. The Sauk is a class three river, consistently more difficult than the sections of the Elwha and Hoh we did the summer before. It was a gray drizzly day and Kelly dropped us off just below a much harder rapid, then she went on a hike, until meeting up with us a couple hours later at a bridge for the take out. The paddle was definitely harder than I had done before, constantly bracing, edging and looking out for the next rock-less avenue. I accidentally capsized three times while trying to eddy out and two of the times easily rolled back up. The third time my boat wouldn't rotate enough to get me set up to roll on my strong side, so I just waited, upside down, floating down a rapid. My boat finally (after what felt like a long time but was probably only a couple of seconds) rotated enough for my paddle to surface and for me to roll up. When I was upright I realize that I was actually sitting on a rock in the middle of the river...a bit disorienting actually.

The second trip I got out on in the spring was a sea paddling trip. Kelly, James, Dom and I drove down to Deer Harbor after work on a Friday and paddled the short distance to Jones Island. We got there late and had to leave early so goodbye Jones (I am kinda tired of that island anyway). The next day we paddled from Jones to Satellite island. Satellite is owned by the YMCA and is nestled in the crescent moon shaped Stuart island. We stayed at Mariner camp on Satellite for two nights. We made a long hike all around the island playing forest/beach bocci ball along the way. We discovered parts of the island that I had never been to before (I visited several times in 06). The next day we paddled to Stuart and hiked out to the light house (one of the most northwestern points in the contiguous U.S.). That evening was riddled with ridiculousness. Excavating missions, eating, fire, more bocci, and watching an Eagle take a massive crap very close to James' tent. Eagles are big, you can only imagine how big their crap is. We set out on our 12-13 mile paddle back to camp on Monday. It was the longest crossing (from Speiden to Orcas) that any of us had ever done and definitely taxed my reserves a bit. Also just the feeling that you aren't going anywhere. The trees on the island you are trying to get to aren't getting any bigger! Are we actually making headway? That was a bit trying in my tired state. But it definitely made me excited about our big inside passage trip next summer.

Near the end of the season I ran the San Juan half-marathon again getting about ten minutes slower than I got three years ago in 07. Not too bad. I trained a bit less this year.

Now the season is over and a lot of people have went their own ways. However quite a few from this season or past seasons are still around either at camp or just on the island. It is definitely a little tight community. I have never been on Orcas in the summer but not be working at camp. It is a strange feeling, but a good feeling. Kelly and I are leading 3-hour kayak tours with Shearwater based out of Eastsound. Our trips go out of Deer Harbor, Rosario, and West beach. The season is having a slow start but as soon and July 4th comes and the weather gets (it's almost July! For real??) then I am sure we will be a' paddling all the time.

We half bought/half work-traded for a geodesic dome (steel tube frame, canvas skin, 16 ft. diameter, 8 ft. tall). We put it up on a little section of property that is just next to Maple Rock Farm. The property is called Ravensong and it is owned by a couple Erin and Michael (who are getting married this week) who have a vision of their ten acres being a collective of like minded individuals sharing the land. They have done beautiful amazing things with the land so far and they seem to be constantly working on it. There is a communal kitchen/common room with electricity and running water, a productive and organized garden, a sauna, a wood stove powered hot tub, a meadow, a pond with a slack-line and a zip-line above it, and beautiful forest. So in the lull before work getting crazy I have been working a bit on Ravensong, hanging out at maple rock, biking around, reading and generally chilling. It looks to be a good summer.

Wednesday, April 14, 2010

Training for a half-marathon

It's hard to run when your lungs and head are filled with fluid. But even when you're sick it still gives the strong sense of satisfaction and peace. Starting out the ache in my legs is very prominent, I move slowly and the dull pulse in my head makes me want to turn back. As the hill levels out, my feet, my steps, my lungs, my breath level out as well. I become a fluid machine and my mind starts to drift. Aided by mellow beats from my headphones, a type of meditation settles in.

Training for a half-marathon is a prime example of the saying "It's not the destination, but the journey". Completing the race is not the reason for running it. It motivates me to run several times a week which no matter my mood, whether I'm tired, energized, grumpy, elated, full, hungry, a run always brings me peace, calming energy, patience and renewed exuberance.

I read an article about meditating while running. The gist was that it makes you focus on your surroundings and think about nothing...also that this wasn't possible to achieve while listening to music. For me music aids in the meditation. Once I reach a groove my surroundings become clearer, the air tastes crisp and the vegetation pops. I can either think about nothing or I can think about everything that has been hiding in the back of my mind...and create solutions to them. I create brilliant plans. I direct my future, consider what I want out of life. It serves the same function as a really good hike, but is more accessible and gives me quicker results.

Monday, March 22, 2010

Orcas Island!

Kelly and I made a quick drive back up to the NW. Colorado was great, we spent all our time working, hanging out with friends and snowboarding. Nothing super eventful happened.

I learned quite a bit about making sushi from working at a sushi lounge called Storm King.
I bowled a 198 in Leadville.
We watched the snowboarding grand prix.
...
Honestly I can't think of too much more.

Since getting back on Orcas we have been working and planning a lot for the season. The new staff showed up last week and we have had a fun first week of training.
We had an amazing race style event leading to our first group barbq.
I've been running a lot preparing for the half marathon in June and been paddling in the bay.

Just thought I would add a short update. More to come when I have some more adventures.

Sunday, January 24, 2010

On The Way to Colorado

Last you heard we were in Port Townsend, but shortly after my last post we left on a month long mini road trip to end up back in Frisco, Colorado (where we lived two winters ago).

First stop on our trip was of course Orcas Island where we stayed for about a week and a half. We saw our old friends and solidified our decision to come back in the spring as leads. We also went on a three day kayaking trip (in October). Needless to say it was cold and rainy and windy the whole time, and it was awesome! Good practice for potential long paddles in my future. The rest of the time there was spent relaxing and catching up.

We next went to Bellingham and stayed with Alex and Sam for a few days. I got to show Kelly around my old stomping grounds. We went on a classic hike up to Oyster Dome and got an amazing view of the San Juans from another angle.
"Hey, we were just there!"
We went out for a beer and some darts one night and I got to see my friends Lynn and Scott who I hadn't seen in like four years or so.

Montana came next where my brother just bought a new house in Missoula. We spent some quality time with Pete and Krista, went to a slightly overpriced David Sedaris show and took a stroll down to the river to see "Brennan's Wave", a man-made standing wave for kayaking. Pretty sweet.

Then we booked it down to New Mexico with a short stop in weird Utah. On a Sunday, where you cannot buy alcohol anywhere...all I wanted after a long day of driving was to drink a beer and watch football. Not a chance.

We spent my birthday with Kelly's parents and went out for some Mexican food, went for some walks and visited a little farm.

Then we visited Tallie and Clarkie in Albequerque. Wine drinking, Mad Men watching, rock gym climbing, and Halloween. We ended up at a house party (I was a rake and Kelly was a pile of leaves). After looking around at the party we realized that everyone looked real young. Then I noticed the glass case with gold trim and pictures of old people in them. Then I saw the home office with like a scanner and computer and drafting table. Then it came to me...this is someone's parents house and these kids could be like 18? Hmm...time to roll out.

-------------------------------------------------------------------------------------------------

Now we are living with Emily, Wizzard, Suzanne, and Pete. That's right six people in a three bedroom. After a good three weeks of looking for a job I finally found one rolling sushi at a lounge on the mountain. It started out slow then there was the really busy winter vacation time where everyone in the house was working all the time. And now it is slow again. However we finally got snow! It has been snowing constantly for like a day and a half. It had been super dry up until then.

Well that was my short update. And soon we will be moving on back to WA. Thanks for reading!